Getting your framework version in run-time

Xcode 13 introduced a new behavior that breaks framework versions: When your clients upload their app, Apple changes the CFBundleShortVersionString of all frameworks to match that of the app.
(See this StackOverflow thread for example)

One way to avoid that is to hard-code your framework version. But if you you want to keep using the MARKETING_VERSION build setting, you can use the following hack.

Create a version variable for your framework, for example:

public class MyFramwork: NSObject {
    @objc static var version: String = ""
}

Then include this Objective-C file in your framework:

#import <MyFramwork/MyFramwork-swift.h>

#define PROCESSOR_STRING(x) PRE_PROCESSOR_STRING_LITERAL(x)
#define PRE_PROCESSOR_STRING_LITERAL(x) @#x

@interface MyFramwork(version)
@property (class) NSString *version; // to access internal property
@end;

@interface MyFramworkLoader: NSObject
@end

@implementation MyFramworkLoader

#ifdef MARKETING_VERSION
+ (void)load {
    dispatch_async(dispatch_get_main_queue(), ^{
        MyFramwork.version = PROCESSOR_STRING(MARKETING_VERSION);
    });
}
#endif

@end

This will assign the MARKETING_VERSION value that you built you framework with, instead of an Apple-manipulated CFBundleShortVersionString value.

Bold part of an NSAttributedString without changing the font

If you bold by changing the `NSFontAttributeName` you’ll have to specify the font face. If you don’t want to change the font face, use the `NSStrokeWidthAttributeName` with a negative value:

let s = NSMutableAttributedString(string: "Text with some bold part")
s.addAttribute(.strokeWidth, value: NSNumber(value: -3.0), range: NSRange(15..<20))

Result:

Text with some bold part

Auto-Compile .proto Files

Google’s protobuf compiler with Apple’s swift plugin converts .proto definitions to .swift implementations.

Instead of converting from the console and then including the generated file in your project, you can include the .proto file in your Xcode project, and let Xcode automatically convert it to swift and use the generated file:

  1. Go to your target Build Rules.
  2. Click the + above to add a custom rule: Sources with names matching: *.proto.
  3. Use the following script:

    protoc --proto_path="$INPUT_FILE_DIR" --swift_out="$DERIVED_FILE_DIR" "$INPUT_FILE_PATH"

  4. Add to Output Files using the + below:

    $(DERIVED_FILE_DIR)/$(INPUT_FILE_BASE).pb.swift

  5. Go to Build Phases, to the Compile Sources section, and add your .proto files to the list.

xcode-proto

Paging Facebook Graph Results

Facebook iOS SDK provides `FBSDKGraphRequest` to get friends, posts, etc. But the results are paged: you only get the first 25 friends (or 5 posts). To get the rest you need to send a new request, not provided by `FBSDKCoreKit`:

[graphRequest startWithCompletionHandler:^(FBSDKGraphRequestConnection *connection, id result, NSError *error) {
	// first handle error and result...
	// then get the next page of results:
	NSString *nextPage = json[@"paging"][@"next"];
	if (nextPage) {
		[[[NSURLSession sharedSession] dataTaskWithURL:[NSURL URLWithString:nextPage] completionHandler:^(NSData *data, NSURLResponse *response, NSError *error) {
			// parse data, handle results, and get the next page recursively.
		}] resume];
	}
}];

To simplify this, I wrote a simple extension to `FBSDKGraphRequest` that handles paging: FBSDKGraphRequest+Paging. Feel free to use it.

Usage:

FBSDKGraphRequest *friendsRequest = [[FBSDKGraphRequest alloc] initWithGraphPath:@"/me/friends" parameters:nil];
[friendsRequest startPagingWithCompletionHandler:^(id result, NSError *error) {
    // check for error...
    // use parsed result:
    NSArray *friends = result[@"data"];
}];

Succinct Auto Layout

Adding constraints programmatically is a verbose endeavor.

Several libraries try to solve this by adding an additional layer between your code and Auto Layout. (PureLayout,Masonry, SnapKit, Lyt, Cartography, and others.)
While they make some things easier, they still require you to learn a new system with new quirks.

Instead, I use MiniLayout — one short file that simply takes the verbosity out of AutoLayout. It does this by using default values for most of NSLayoutConstraint’s parameters, and by compressing the cumbersome view.addConstraint( NSLayoutConstraint(...) ) into a single call.

Examples:

Put label over textField

// using MiniLayout:
view.constrain(label, at: .Leading, to: textField)
view.constrain(textField, at: .Top, to: label, at: .Bottom, diff: 8)

// without MiniLayout:
view.addConstraint( NSLayoutConstraint(item: label, attribute: .Leading, relatedBy: Equal, toItem: textField, attribute: .Leading, multiplier: 1, constant: 0) )
view.addConstraint( NSLayoutConstraint(item: textField, attribute: .Top, relatedBy: Equal, toItem: label, attribute: .Bottom, multiplier: 1, constant: 8) )

Add button at the center of view

// using MiniLayout:
view.addConstrainedSubview(button, constrain: .CenterX, .CenterY)

// without MiniLayout:
view.addSubview(button)
button.setTranslatesAutoresizingMaskIntoConstraints(false)
view.addConstraint( NSLayoutConstraint(item: button, attribute: .CenterX, relatedBy: Equal, toItem: view, attribute: .CenterX, multiplier: 1, constant: 0) )
view.addConstraint( NSLayoutConstraint(item: button, attribute: .CenterY, relatedBy: Equal, toItem: view, attribute: .CenterY, multiplier: 1, constant: 0) )

MiniLayout uses the same enums and the same logic as AutoLayout, there’s nothing new to learn. It just makes the code shorter and more readable.

layoutSubviews Considered Reentrant

I had the weirdest bug the other day: rotating the iPhone worked fine in iOS 7, but not in iOS 8. Actually it was weirder: Some UIView instances adjusted themselves perfectly after the rotation, but some had the wrong size (even though they all had the exact same UIView subclass).

After some digging I discovered that layoutSubview was called several times during rotation, and each time the view had a different frame. Moreover, these calls were not happening sequentially! Instead, layoutSubviews was called with frame1, and before returning it was being called with frame2, and before returning form that it was called with frame3 — all for the same UIView.

There wasn’t a lot of code in my layoutSubviews, nothing that takes long. But it was apparently long enough to cause a bug in some instances.

My solution was to schedule a layout update for a split second later:

- (void)layoutSubviews
{
    [super layoutSubviews];
    [self performSelector:@selector(adjustLayout) withObject:nil afterDelay:0.01]; // avoid re-entering with different frame
}

- (void)adjustLayout
{
    if (CGRectEqualToRect(self.bounds, self.oldBounds)) return;
    // layout code here
    self.oldBounds = self.bounds;
}

The Simplest iOS Badge

SimplestBadgeLabel
In the past I used a UILabel subclass to show a badge. But since the dawn of flat UI, there’s no need to subclass.

Here is all the code you need:

let label = UILabel()
label.clipsToBounds = true
label.layer.cornerRadius = label.font.pointSize * 1.2 / 2
label.backgroundColor = UIColor.grayColor()
label.textColor = UIColor.whiteColor()
label.text = " Some Text "; // note spaces before and after text

All it does is set the cornerRadius of the label’s underlying CALayer, and add spaces before and after the label text. That’s it!

For nicely organized badge extension for UILabel and UIButton and UIBarButtonItem, see this GitHub gist:
Badge.swift

How to Set The Image Name When Saving to The Camera Roll

In principle, you can’t. But in practice, there is a way… Read on to find out.

iOS names the image IMG_<num> to avoid file name clashes. There is no way to change that from your app.
However, if the user later imports an image to iPhoto, then the metadata of the image will determine its title, description, and keywords.
If the user then exports the image to file, iPhoto can use the title for the name of the exported file. (Instructions for doing that are down below, after the code.)

Here is the code to set the metadata and save the image to the camera roll. The code below gets the image from the camera, but this isn’t necessary – the image can come from anywhere.

#import 
#import 

- (void) imagePickerController: (UIImagePickerController *)picker didFinishPickingMediaWithInfo: (NSDictionary *)info
{
    [self dismissViewControllerAnimated:YES completion:nil];
    UIImage *image = info[UIImagePickerControllerOriginalImage];
    NSMutableDictionary *metadata = info[UIImagePickerControllerMediaMetadata];

    // set image name and keywords in IPTC metadata
    NSString *iptcKey = (NSString *)kCGImagePropertyIPTCDictionary;
    NSMutableDictionary *iptcMetadata = metadata[iptcKey];
    iptcMetadata[(NSString *)kCGImagePropertyIPTCObjectName] = @"Image Title";
    iptcMetadata[(NSString *)kCGImagePropertyIPTCKeywords] = @"some keywords";
    metadata[iptcKey] = iptcMetadata;

    // set image description in TIFF metadata
    NSString *tiffKey = (NSString *)kCGImagePropertyTIFFDictionary;
    NSMutableDictionary *tiffMetadata = metadata[tiffKey];
    tiffMetadata[(NSString *)kCGImagePropertyTIFFImageDescription] = @"Description for image"; // only visible in iPhoto when IPTCObjectName is set
    metadata[tiffKey] = tiffMetadata;

    // save image to camera roll
    ALAssetsLibrary library = [[ALAssetsLibrary alloc] init];
    [library writeImageToSavedPhotosAlbum:image.CGImage metadata:metadata completionBlock:nil];
}

Now the user can import the images to iPhoto and get your programmed title, description, and keywords.

To export the images to files that have the same name as the image title, the user should choose File > Export and then change the File Name field to Use title.

export

Simple UIProgressHUD replacement

The private API UIProgressHUD shows an activity indicator (spinner) over a shaded round rect. Although you can use fancy and flexible replacements like MBProgressHUD, there is a simpler way if you don’t need all the extra functionality: Take a regular UIActivityIndicatorView and add a partly transparent UIView behind it.

The simplest is to subclass of UIActivityIndicatorView so you can use it like any activity indicator.

The interface file:

//  ActivityHUD.h
#import 

@interface ActivityHUD : UIActivityIndicatorView
- (ActivityHUD *)initInView:(UIView *)view;
@end

And the implementation file:

//  ActivityHUD.m
#import "ActivityHUD.h"
#import 

@implementation ActivityHUD

- (ActivityHUD *)initInView:(UIView *)view
{
    self = [super initWithActivityIndicatorStyle:UIActivityIndicatorViewStyleWhiteLarge];
    if (self) {
        // add background view
        CGFloat border = self.bounds.size.height / 2;
        CGRect hudFrame = CGRectInset(self.bounds, -border, -border);
        UIView *hud = [[UIView alloc] initWithFrame:hudFrame];
        hud.backgroundColor = [UIColor colorWithRed:0 green:0 blue:0 alpha:0.67];
        hud.layer.cornerRadius = border;
        [self addSubview:hud];
        [self sendSubviewToBack:hud];

        // center in parent view
        [view addSubview:self];
        self.center = [self convertPoint:view.center fromView:view];
    }
    return self;
}

@end

To use, init the ActivityHUD in a view, and later call startAnimating to show it, and stopAnimating to hide.

Dynamic UIActionSheet

Some actions may sometimes have more than one possible target, and other times only one.

For example: Calling a contact. If the contact has just one phone number, you openURL with it and you’re done. But if she has several numbers, you want to open a UIActionSheet to let the user choose which number to call.

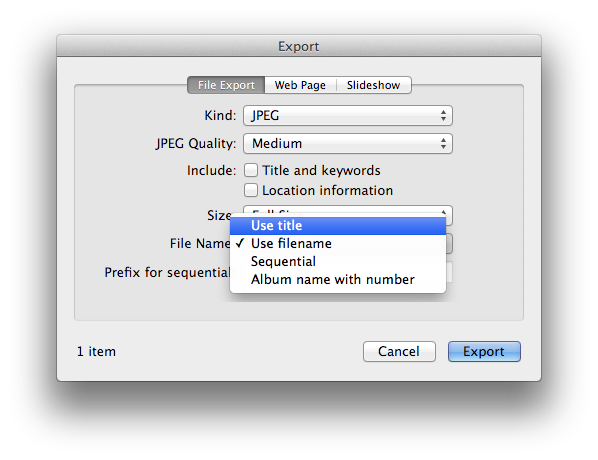
Or picking an image. If you’re running on a camera-less iPod, you just show a UIImagePickerController to pick from the photo library. But with a camera, and maybe an existing image to delete, you’ll want to show an action sheet to choose the actual action that your “Photo” button performs.

So you need to do two things:

  1. Decide whether to show an action sheet at all or just do the one possible action.
  2. If you need an action sheet, fill it dynamically with the possible targets for action.

The code to do that doesn’t have to be complicated. It can actually be as simple as this:

@interface MyViewController() :  {
	NSArray *possibleTargets; // action sheet buttons go here
}
@end

@implementation MyViewControllerMyViewController

- (IBAction)selectTargetForAction:(id)sender
{
    possibleTargets = SomeWayToFindPossibleTargets();

    if ([possibleTargets count] == 1) {
        // just call the one number, or show the one image picker
        [self doAction:[possibleTargets lastObject]];
    }
    else if ([possibleTargets count] > 1) {
        // show a dynamically filled action sheet
        UIActionSheet *targetsSheet =
            [[UIActionSheet alloc] initWithTitle:__(@"Select")
                delegate:self
                cancelButtonTitle:nil // since we want it last
                destructiveButtonTitle:nil
                otherButtonTitles:nil]; // since we can't hard-code them
        for (NSString *target in possibleTargets) {
            [targetsSheet addButtonWithTitle:__(target.title)];
        }
        targetsSheet.cancelButtonIndex = [targetsSheet addButtonWithTitle:__(@"Cancel")];
        [targetsSheet showInView:self.view];
    }
}

- (void)actionSheet:(UIActionSheet *)actionSheet clickedButtonAtIndex:(NSInteger)buttonIndex
{
    if (buttonIndex != actionSheet.cancelButtonIndex) {
        [self doAction:[possibleTargets objectAtIndex:buttonIndex]];
    }
}

@end

Notes:

  1. The @interface code above is part of the .m file, as described in my earlier post How to Keep Your Protocols Private.
  2. If you’re puzzled by the meaning of __(@"String") then see my earlier post on How To Make NSLocalizedString Fun To Use.
  3. The objects in possibleTargets can hold a selector (SEL) of the actual method to be executed, or they can hold just relevant data for the action (like a phone number to call).