The Simplest Checkbox UIButton

You don’t need to change the image on tap!

Buttons can change their own images when their state changes, so you only need to change the button state:

button.setImage(UIImage(systemName: "square"), for: .normal)
button.setImage(UIImage(systemName: "checkmark.square.fill"), for: .selected)
button.addAction(UIAction { _ in button.isSelected.toggle() }, for: .touchUpInside)

You can also setTitle() and it will all work out-of the box, though you may want to adjust the button.configuration to make it look nice.

For a full (yet short) implementation, see my gist:
CheckboxButton.swift

Find The Writing Direction Of A String

When you need to know if a string is right-to-left (rtl) or left-to-right (ltr) – don’t check individual characters. Instead, use the Natural Language framework, available since iOS 12 and macOS 10.14:

import NaturalLanguage

extension String {
    var isRightToLeft: Bool {
        guard let language = NLLanguageRecognizer.dominantLanguage(for: self) else { return false }
        switch language {
        case .arabic, .hebrew, .persian, .urdu:
            return true
        default:
            return false
        }
    }
}

Then just use it like this:

if "שלום and سلام".isRightToLeft {
    // do what needs to be done
}

Getting your framework version in run-time

Xcode 13 introduced a new behavior that breaks framework versions: When your clients upload their app, Apple changes the CFBundleShortVersionString of all frameworks to match that of the app.
(See this StackOverflow thread for example)

One way to avoid that is to hard-code your framework version. But if you you want to keep using the MARKETING_VERSION build setting, you can use the following hack.

Create a version variable for your framework, for example:

public class MyFramwork: NSObject {
    @objc static var version: String = ""
}

Then include this Objective-C file in your framework:

#import <MyFramwork/MyFramwork-swift.h>

#define PROCESSOR_STRING(x) PRE_PROCESSOR_STRING_LITERAL(x)
#define PRE_PROCESSOR_STRING_LITERAL(x) @#x

@interface MyFramwork(version)
@property (class) NSString *version; // to access internal property
@end;

@interface MyFramworkLoader: NSObject
@end

@implementation MyFramworkLoader

#ifdef MARKETING_VERSION
+ (void)load {
    dispatch_async(dispatch_get_main_queue(), ^{
        MyFramwork.version = PROCESSOR_STRING(MARKETING_VERSION);
    });
}
#endif

@end

This will assign the MARKETING_VERSION value that you built you framework with, instead of an Apple-manipulated CFBundleShortVersionString value.

Bold part of an NSAttributedString without changing the font

If you bold by changing the `NSFontAttributeName` you’ll have to specify the font face. If you don’t want to change the font face, use the `NSStrokeWidthAttributeName` with a negative value:

let s = NSMutableAttributedString(string: "Text with some bold part")
s.addAttribute(.strokeWidth, value: NSNumber(value: -3.0), range: NSRange(15..<20))

Result:

Text with some bold part

Paging Facebook Graph Results

Facebook iOS SDK provides `FBSDKGraphRequest` to get friends, posts, etc. But the results are paged: you only get the first 25 friends (or 5 posts). To get the rest you need to send a new request, not provided by `FBSDKCoreKit`:

[graphRequest startWithCompletionHandler:^(FBSDKGraphRequestConnection *connection, id result, NSError *error) {
	// first handle error and result...
	// then get the next page of results:
	NSString *nextPage = json[@"paging"][@"next"];
	if (nextPage) {
		[[[NSURLSession sharedSession] dataTaskWithURL:[NSURL URLWithString:nextPage] completionHandler:^(NSData *data, NSURLResponse *response, NSError *error) {
			// parse data, handle results, and get the next page recursively.
		}] resume];
	}
}];

To simplify this, I wrote a simple extension to `FBSDKGraphRequest` that handles paging: FBSDKGraphRequest+Paging. Feel free to use it.

Usage:

FBSDKGraphRequest *friendsRequest = [[FBSDKGraphRequest alloc] initWithGraphPath:@"/me/friends" parameters:nil];
[friendsRequest startPagingWithCompletionHandler:^(id result, NSError *error) {
    // check for error...
    // use parsed result:
    NSArray *friends = result[@"data"];
}];

layoutSubviews Considered Reentrant

I had the weirdest bug the other day: rotating the iPhone worked fine in iOS 7, but not in iOS 8. Actually it was weirder: Some UIView instances adjusted themselves perfectly after the rotation, but some had the wrong size (even though they all had the exact same UIView subclass).

After some digging I discovered that layoutSubview was called several times during rotation, and each time the view had a different frame. Moreover, these calls were not happening sequentially! Instead, layoutSubviews was called with frame1, and before returning it was being called with frame2, and before returning form that it was called with frame3 — all for the same UIView.

There wasn’t a lot of code in my layoutSubviews, nothing that takes long. But it was apparently long enough to cause a bug in some instances.

My solution was to schedule a layout update for a split second later:

- (void)layoutSubviews
{
    [super layoutSubviews];
    [self performSelector:@selector(adjustLayout) withObject:nil afterDelay:0.01]; // avoid re-entering with different frame
}

- (void)adjustLayout
{
    if (CGRectEqualToRect(self.bounds, self.oldBounds)) return;
    // layout code here
    self.oldBounds = self.bounds;
}

The Simplest iOS Badge

SimplestBadgeLabel
In the past I used a UILabel subclass to show a badge. But since the dawn of flat UI, there’s no need to subclass.

Here is all the code you need:

let label = UILabel()
label.clipsToBounds = true
label.layer.cornerRadius = label.font.pointSize * 1.2 / 2
label.backgroundColor = UIColor.grayColor()
label.textColor = UIColor.whiteColor()
label.text = " Some Text "; // note spaces before and after text

All it does is set the cornerRadius of the label’s underlying CALayer, and add spaces before and after the label text. That’s it!

For nicely organized badge extension for UILabel and UIButton and UIBarButtonItem, see this GitHub gist:
Badge.swift

How to Set The Image Name When Saving to The Camera Roll

In principle, you can’t. But in practice, there is a way… Read on to find out.

iOS names the image IMG_<num> to avoid file name clashes. There is no way to change that from your app.
However, if the user later imports an image to iPhoto, then the metadata of the image will determine its title, description, and keywords.
If the user then exports the image to file, iPhoto can use the title for the name of the exported file. (Instructions for doing that are down below, after the code.)

Here is the code to set the metadata and save the image to the camera roll. The code below gets the image from the camera, but this isn’t necessary – the image can come from anywhere.

#import 
#import 

- (void) imagePickerController: (UIImagePickerController *)picker didFinishPickingMediaWithInfo: (NSDictionary *)info
{
    [self dismissViewControllerAnimated:YES completion:nil];
    UIImage *image = info[UIImagePickerControllerOriginalImage];
    NSMutableDictionary *metadata = info[UIImagePickerControllerMediaMetadata];

    // set image name and keywords in IPTC metadata
    NSString *iptcKey = (NSString *)kCGImagePropertyIPTCDictionary;
    NSMutableDictionary *iptcMetadata = metadata[iptcKey];
    iptcMetadata[(NSString *)kCGImagePropertyIPTCObjectName] = @"Image Title";
    iptcMetadata[(NSString *)kCGImagePropertyIPTCKeywords] = @"some keywords";
    metadata[iptcKey] = iptcMetadata;

    // set image description in TIFF metadata
    NSString *tiffKey = (NSString *)kCGImagePropertyTIFFDictionary;
    NSMutableDictionary *tiffMetadata = metadata[tiffKey];
    tiffMetadata[(NSString *)kCGImagePropertyTIFFImageDescription] = @"Description for image"; // only visible in iPhoto when IPTCObjectName is set
    metadata[tiffKey] = tiffMetadata;

    // save image to camera roll
    ALAssetsLibrary library = [[ALAssetsLibrary alloc] init];
    [library writeImageToSavedPhotosAlbum:image.CGImage metadata:metadata completionBlock:nil];
}

Now the user can import the images to iPhoto and get your programmed title, description, and keywords.

To export the images to files that have the same name as the image title, the user should choose File > Export and then change the File Name field to Use title.

export

Workaround for bug in [NSMutableIndexSet shiftIndexesStartingAtIndex:by:]

The Bug

Shifting an NSMutableIndexSet by a negative number will drop an index in some cases.

Example Code:

NSMutableIndexSet *set = [NSMutableIndexSet indexSetWithIndex:0];
[set addIndex:2];
[set shiftIndexesStartingAtIndex:1 by:-1];
NSLog(@"%@", set);

The set should contain 0-1 but instead contains only 1.

The Reason

NSIndexSet is a series of NSRange-s. If the shift method removes empty space between ranges, than they should become a single unified range. For example, if a set contains the range 1-2 and the range 5-6, and we do

[set shiftIndexesStartingAtIndex:3 by:-2];

then we should get a set with a single range 1-4.

However, the implementation of shiftIndexesStartingAtIndex:by: fails to unify ranges, and also assumes that separate ranges have at least one empty space between them. And so we get a set containing the ranges 1-1 and 3-4.

The Workaround

Luckily, the methods addIndex: and addIndexesInRange: do correctly unify ranges. And so the workaround is to first call one of these methods, and only then shift:

[set addIndexesInRange:NSMakeRange(3, 2)];
[set shiftIndexesStartingAtIndex:3 by:-2];

Simple UIProgressHUD replacement

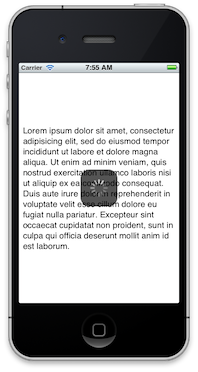
The private API UIProgressHUD shows an activity indicator (spinner) over a shaded round rect. Although you can use fancy and flexible replacements like MBProgressHUD, there is a simpler way if you don’t need all the extra functionality: Take a regular UIActivityIndicatorView and add a partly transparent UIView behind it.

The simplest is to subclass of UIActivityIndicatorView so you can use it like any activity indicator.

The interface file:

//  ActivityHUD.h
#import 

@interface ActivityHUD : UIActivityIndicatorView
- (ActivityHUD *)initInView:(UIView *)view;
@end

And the implementation file:

//  ActivityHUD.m
#import "ActivityHUD.h"
#import 

@implementation ActivityHUD

- (ActivityHUD *)initInView:(UIView *)view
{
    self = [super initWithActivityIndicatorStyle:UIActivityIndicatorViewStyleWhiteLarge];
    if (self) {
        // add background view
        CGFloat border = self.bounds.size.height / 2;
        CGRect hudFrame = CGRectInset(self.bounds, -border, -border);
        UIView *hud = [[UIView alloc] initWithFrame:hudFrame];
        hud.backgroundColor = [UIColor colorWithRed:0 green:0 blue:0 alpha:0.67];
        hud.layer.cornerRadius = border;
        [self addSubview:hud];
        [self sendSubviewToBack:hud];

        // center in parent view
        [view addSubview:self];
        self.center = [self convertPoint:view.center fromView:view];
    }
    return self;
}

@end

To use, init the ActivityHUD in a view, and later call startAnimating to show it, and stopAnimating to hide.