The Simplest Checkbox UIButton

You don’t need to change the image on tap!

Buttons can change their own images when their state changes, so you only need to change the button state:

button.setImage(UIImage(systemName: "square"), for: .normal)
button.setImage(UIImage(systemName: "checkmark.square.fill"), for: .selected)
button.addAction(UIAction { _ in button.isSelected.toggle() }, for: .touchUpInside)

You can also setTitle() and it will all work out-of the box, though you may want to adjust the button.configuration to make it look nice.

For a full (yet short) implementation, see my gist:
CheckboxButton.swift

Find The Writing Direction Of A String

When you need to know if a string is right-to-left (rtl) or left-to-right (ltr) – don’t check individual characters. Instead, use the Natural Language framework, available since iOS 12 and macOS 10.14:

import NaturalLanguage

extension String {
    var isRightToLeft: Bool {
        guard let language = NLLanguageRecognizer.dominantLanguage(for: self) else { return false }
        switch language {
        case .arabic, .hebrew, .persian, .urdu:
            return true
        default:
            return false
        }
    }
}

Then just use it like this:

if "שלום and سلام".isRightToLeft {
    // do what needs to be done
}

Getting your framework version in run-time

Xcode 13 introduced a new behavior that breaks framework versions: When your clients upload their app, Apple changes the CFBundleShortVersionString of all frameworks to match that of the app.
(See this StackOverflow thread for example)

One way to avoid that is to hard-code your framework version. But if you you want to keep using the MARKETING_VERSION build setting, you can use the following hack.

Create a version variable for your framework, for example:

public class MyFramwork: NSObject {
    @objc static var version: String = ""
}

Then include this Objective-C file in your framework:

#import <MyFramwork/MyFramwork-swift.h>

#define PROCESSOR_STRING(x) PRE_PROCESSOR_STRING_LITERAL(x)
#define PRE_PROCESSOR_STRING_LITERAL(x) @#x

@interface MyFramwork(version)
@property (class) NSString *version; // to access internal property
@end;

@interface MyFramworkLoader: NSObject
@end

@implementation MyFramworkLoader

#ifdef MARKETING_VERSION
+ (void)load {
    dispatch_async(dispatch_get_main_queue(), ^{
        MyFramwork.version = PROCESSOR_STRING(MARKETING_VERSION);
    });
}
#endif

@end

This will assign the MARKETING_VERSION value that you built you framework with, instead of an Apple-manipulated CFBundleShortVersionString value.

SwiftUI: @Binding Type Conversion

What can you do if a @Binding var has a different type from the @State var you want to bind to it?

For example, say you have a Slider which you bind to a Double state var, and you want to bind the same state var to an Int in another View:

struct MyView: View {
    @State private var currentStep: Double = 0.0
 
    var body: some View {
        Slider(value: $currentStep, in: 0.0 ... 9.0, step: 1.0)
        ViewWithInt(bindingInt: $currentStep) // Error: 'Binding<Double>' is not convertible to 'Binding<Int>'
    }
}

Solution: define an Int property on Double:

extension Double {
     var int: Int {
         get { Int(self) }
         set { self = Double(newValue) }
     }
 }

Then you can bind this int property:

ViewWithInt(bindingInt: $currentStep.int) // Works

Useful Custom Rules for SwiftLint

SwiftLint and SwiftFormat together cover 80% of recurring code-review comments. They’re great, use them.

To cover the last 20%, you can add custom rules to your SwiftLint configuration file .swiftlint.yml. Below are some of the custom rules I developed over time.

Auto-generated Leftovers

When you use Xcode’s templates to create a new class, you’ll get some auto-generated code that you don’t need, adding noise and making it harder to find the useful code. Just delete it.

custom_rules:
  auto_generated_leftovers:
    regex: 'func [^\n]*\{\n(\s*super\.[^\n]*\n(\s*\/\/[^\n]*\n)*|(\s*\/\/[^\n]*\n)+)\s*\}'
    message: "Delete auto-generated functions that you don't use"

Numbers Are a Code Small

You probably know that you shouldn’t put raw numbers in code, right? Only use constants and variables, right? Well, whenever I run the following rule on a code-base, I get a surprising number of warnings.

custom_rules:
  numbers_smell:
    regex: '(return |case |\w\(|: |\?\? |\, |== |<=? |>=? |\+= |\-= |\/= |\*= |%= |\w\.\w+ = )\(*-?\d{2,}'
    message: "Numbers smell; define a constant instead."
    excluded: '.*Tests/'

NSLocalizedString

Localization is not a priority in many projects, but when you suddenly need to convert all strings to localized strings – that’s a lot of work, with a good chance of missing some strings.

The following rule is not perfect, but it seems to work well enough.

custom_rules:
  non_localized_string:
    regex: '(?<!NSLocalizedString\(|fatalError\(|assertionFailure\(|preconditionFailure\(|assert\(false, |format: |separator: |deprecated, message: |\w|\")(?:"[^" \n]+ [^"\n]*"|"[[:upper:]][[:lower:]]+"|""".*?""")'
    message: "Wrap string in NSLocalizedString()"
    match_kinds: string
    excluded: '.*Tests/'

Comparing to Bool

I’m not sure why anyone would do such a thing, but some people write if (isHidden == true) instead of simply if isHidden. I don’t even know in which language that would make sense, but definitely not Swift. Therefore:

custom_rules:
  already_true:
    regex: "== true"
    message: "Don't compare to true, just use the bool value."
  already_bool:
    regex: "== false"
    message: "Don't compare to false, just use !value."

Commented-out Code

If you use source-control, there is no reason to leave old commented-out code – you can always find it in your repository. Just clean it up.

custom_rules:
  commented_code:
    regex: '(?&lt;!:|\/)\/\/\h*[a-z.](?!wiftlint)'
    message: "Comment starting with lowercase letter - did you forget to delete old code?"
  multiline_commented_code:
    regex: '^\s*[a-z]'
    match_kinds: comment
    message: "Comment starting with lowercase letter - did you forget to delete old code?"

Bold part of an NSAttributedString without changing the font

If you bold by changing the `NSFontAttributeName` you’ll have to specify the font face. If you don’t want to change the font face, use the `NSStrokeWidthAttributeName` with a negative value:

let s = NSMutableAttributedString(string: "Text with some bold part")
s.addAttribute(.strokeWidth, value: NSNumber(value: -3.0), range: NSRange(15..<20))

Result:

Text with some bold part

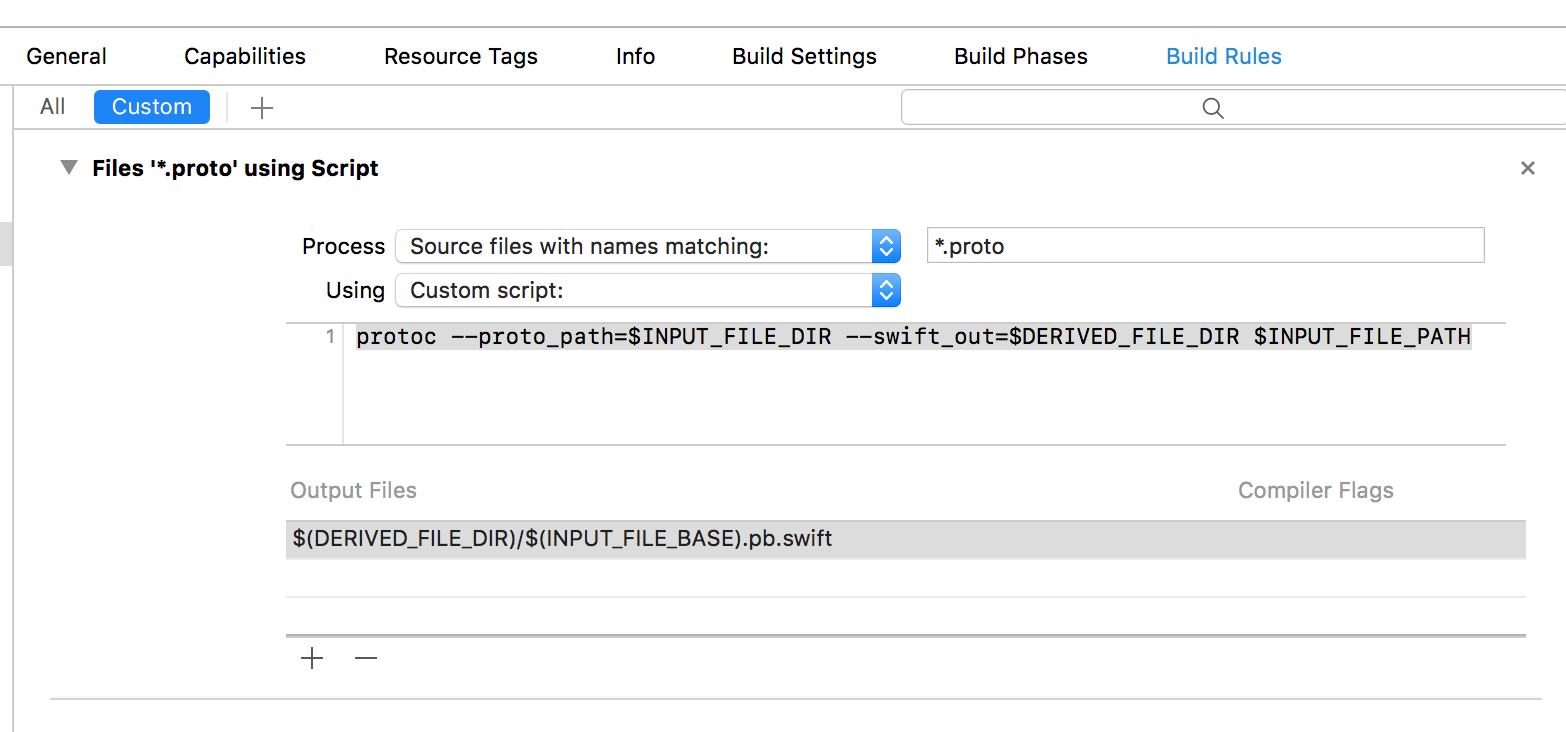
Auto-Compile .proto Files

Google’s protobuf compiler with Apple’s swift plugin converts .proto definitions to .swift implementations.

Instead of converting from the console and then including the generated file in your project, you can include the .proto file in your Xcode project, and let Xcode automatically convert it to swift and use the generated file:

  1. Go to your target Build Rules.
  2. Click the + above to add a custom rule: Sources with names matching: *.proto.
  3. Use the following script:

    protoc --proto_path="$INPUT_FILE_DIR" --swift_out="$DERIVED_FILE_DIR" "$INPUT_FILE_PATH"

  4. Add to Output Files using the + below:

    $(DERIVED_FILE_DIR)/$(INPUT_FILE_BASE).pb.swift

  5. Go to Build Phases, to the Compile Sources section, and add your .proto files to the list.

xcode-proto

Succinct Auto Layout

Adding constraints programmatically is a verbose endeavor.

Several libraries try to solve this by adding an additional layer between your code and Auto Layout. (PureLayout,Masonry, SnapKit, Lyt, Cartography, and others.)
While they make some things easier, they still require you to learn a new system with new quirks.

Instead, I use MiniLayout — one short file that simply takes the verbosity out of AutoLayout. It does this by using default values for most of NSLayoutConstraint’s parameters, and by compressing the cumbersome view.addConstraint( NSLayoutConstraint(...) ) into a single call.

Examples:

Put label over textField

// using MiniLayout:
view.constrain(label, at: .Leading, to: textField)
view.constrain(textField, at: .Top, to: label, at: .Bottom, diff: 8)

// without MiniLayout:
view.addConstraint( NSLayoutConstraint(item: label, attribute: .Leading, relatedBy: Equal, toItem: textField, attribute: .Leading, multiplier: 1, constant: 0) )
view.addConstraint( NSLayoutConstraint(item: textField, attribute: .Top, relatedBy: Equal, toItem: label, attribute: .Bottom, multiplier: 1, constant: 8) )

Add button at the center of view

// using MiniLayout:
view.addConstrainedSubview(button, constrain: .CenterX, .CenterY)

// without MiniLayout:
view.addSubview(button)
button.setTranslatesAutoresizingMaskIntoConstraints(false)
view.addConstraint( NSLayoutConstraint(item: button, attribute: .CenterX, relatedBy: Equal, toItem: view, attribute: .CenterX, multiplier: 1, constant: 0) )
view.addConstraint( NSLayoutConstraint(item: button, attribute: .CenterY, relatedBy: Equal, toItem: view, attribute: .CenterY, multiplier: 1, constant: 0) )

MiniLayout uses the same enums and the same logic as AutoLayout, there’s nothing new to learn. It just makes the code shorter and more readable.

The Simplest iOS Badge

SimplestBadgeLabel
In the past I used a UILabel subclass to show a badge. But since the dawn of flat UI, there’s no need to subclass.

Here is all the code you need:

let label = UILabel()
label.clipsToBounds = true
label.layer.cornerRadius = label.font.pointSize * 1.2 / 2
label.backgroundColor = UIColor.grayColor()
label.textColor = UIColor.whiteColor()
label.text = " Some Text "; // note spaces before and after text

All it does is set the cornerRadius of the label’s underlying CALayer, and add spaces before and after the label text. That’s it!

For nicely organized badge extension for UILabel and UIButton and UIBarButtonItem, see this GitHub gist:
Badge.swift